Raine’s Guide: How to Set Up A Payment Plan With Paypal
::2022 Update:: – The Paypal interface has changed and this is no longer accurate.
Payment plans are basically the layaway of second hand lolita sales. Someone asks for a payment plan, they decided with the seller how long, and how much should be paid each time, and then they make payments (often gift / friends and family payments, which is against paypals terms, just FYI) to the seller until it’s paid off, and then the seller ships.
I did a quick search of my blog, and I didn’t find anything about payment plans here, but I know I have in the past been fairly vocal about the fact that I don’t really like payment plans. The reason I don’t like payment plans is that they make the seller take on the responsibility of credit without any incentive, and no proof of the buyer’s ability or likelihood to pay. Outside of the lolita world credit cards and loans both require that the person borrowing the money prove through their credit history or income level that they will be likely to repay. They both also charge fees and interest if someone fails to do so.
And traditionally, since payment plans require the seller to bill the buyer periodically, there are issues with paypal protection not really working out right, and extra fees if it’s done by invoice. If it’s done by friends and family (gift) payments, you are in violation of paypal terms and as a seller can get your paypal account shut down. I’ve done them, but I don’t like to do them. It’s more work for me, and it’s less security for the buyer (get ripped off? you have pretty much no way to get your money back as a buyer. It sucks). A bad situation all around, IMHO.
So personally, I don’t take payment plans on anything until it’s failed to sell for a couple weeks. Then, at that point, I’ll accept them because there really is no alternative other than letting the item sit up for sale indefinitely.
A little while ago, paypal updated their interface for invoices, and unless you look closely at it (I do because I sell a lot on LM), you might have missed the fact that they actually added something that lets you set up a 90-day (or less) payment plan inside a single invoice. Suddenly, it’s secure, you don’t have to worry about billing the person over and over, and it’s nice and easy to set up.
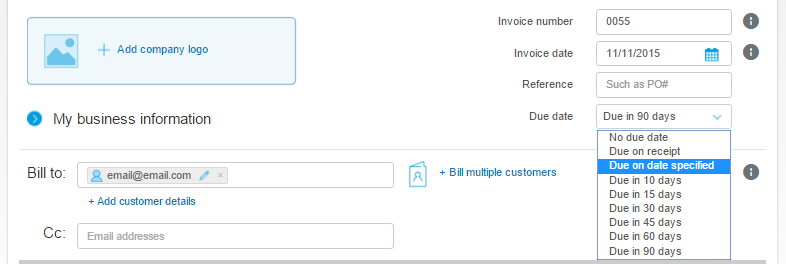
Here is what one looks like, and then below, I’ll go through how to best fill it out as the seller, so you can make the transaction as safe and as easy as possible for everyone involved.
Alright, so let’s look a little closer at this
First, you want to put the email of the person you are invoicing into the Bill to: line like normal. If they asked to be emailed at another email address, you can put that under Cc: and they will get all the emails about this invoice at that email as well (good for people who don’t use their paypal email address as an email address).
The invoice number just counts up from zero if you don’t change it. I leave mine be. By the way, if you are ever a buyer having an issue with a seller though, it’s helpful to tell the seller the invoice number or remind them of your paypal right in your message if you think they might have a lot of buyers. That way they don’t have top open a bunch of invoices to find yours.
Invoice date is the date of the invoice. Typically, you leave this as is.
Due date is really important. You want to pick the date that the buyer is supposed to have sent their last payment by. Make sure you discuss what that date is with the buyer first. I usually do 10 days out for non-payment plans. That way, I have a clear cut off for when to relist if they aren’t paying or answering.
For payment plans though, they are typically going to vary from about two weeks, to a couple months. I would not recommend going longer than 90 days (~ 3 months).
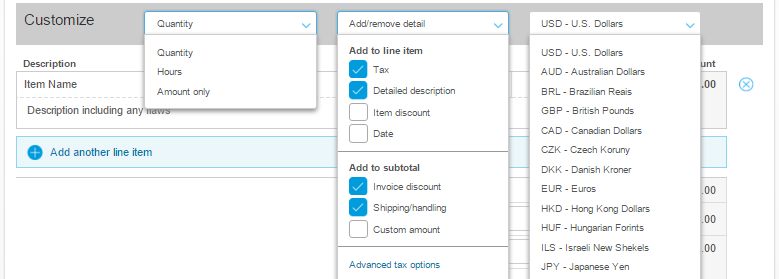
The customize bar lets you change what options are on your invoice. If you have decided to do a non-refundable deposit, you want to turn on “Item discount” and “custom amount” from the add/remove detail menu. Otherwise, keep the options shown, though you can remove “tax” if you want. The currency field is useful if you decided with your buyer that the invoice would be in a different currency. DO NOT spring this on them without asking though, buyers will get upset if they have to suddenly pay a currency conversion fee with their bank!
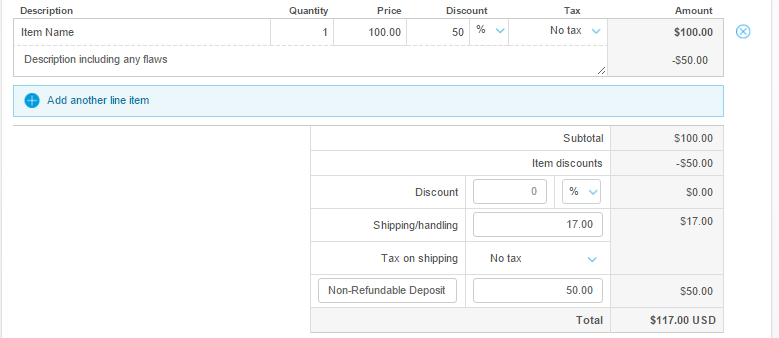
Enter in the name of each item they are buying. Use a name that matches your Lace Market, EGL-Comm-Sales, or Facebook Sales listing. In the description field make sure you explicitly state any flaws. Also include if it is new without tags (NWOT), New with tags (NWT) or used. Enter the quantity and price. This price should be the final price of each item NOT including shipping (unless you are offering free shipping). Remember, it’s against paypal terms to charge paypal fees separately, so they should have been included in your item price when you listed it for sale.
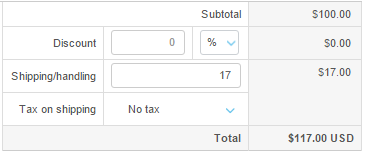
Next, enter the shipping and handling. If you are charging for packing materials, this should be included in the shipping price if it was not included in the item price (and should have been explained to your buyer already).
This is for an item without a non-refundable deposit. If you want to do a non-refundable deposit, you want to set things up a little differently.
Ok, so here we have the item, and the full price is put in ($100), and then, we are asking the buyer to pay a 50% non-refundable deposit. So, we add a 50% discount to the item (you can do a flat dollar amount or a percent). This shows that the item is worth $100, but the person is only paying $50 for the item, so if they return it, they should only get $50 back.
The other 50% is the non-refundable deposit, and we add that by selecting “custom amount” on that options menu from before. So my options menu now looks like this.
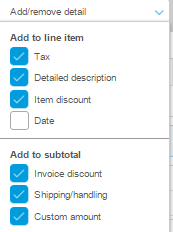 In the left-side field, add in the description. In this case, it’s non-refundable deposit. I would suggest specifically saying it’s non-refundable right there. Then there is absolutely no way they can say that they didn’t know it was non-refundable if they try to file a paypal claim.
However much you discounted the item by above, should be the same amount you enter here. So it’s the exact same total, but you have covered all your bases as far as documenting what is and isn’t refundable in the case of a dispute. 
this is where the magic happens. To the right of the total line, there is a box that says “Allow partial payment”. If you click this, it gives you the option of entering a minimum payment, or leaving it blank. I personally would suggest either putting in what you worked out as the payment amounts with the buyer, or putting in at least $5-$10 on a smaller item, or $25/$50/$100 on a more expensive item. You really don’t want someone to pay you a single dollar each time, especially as I was unable to find any documentation that explained if you would be charged the $0.30 US usage fee each time they make a payment, or not.
Lastly, and this is important, add a little thank you note in the left box, and your terms in the right box. Anything you agreed on with the buyer as far as what is and isn’t refunded, how long they have to pay, etc, needs to go in this box. Paying the first deposit, is that person’s agreement that they accept your terms. So this protects you as the seller from a buyer saying “I should get a full refund” when you have a non-refundable deposit, or from them saying that they should get more time to pay than you agreed. It also protects the buyer by outlining what they are able to get as a refund (if anything), and how long they have to pay (so it can’t be closed early with no refund).
Correction: Buyer protection doesn’t protect split payments, unfortunately.
So, what are your thoughts? Will you be using this in the future for payment plans? Let me know in the comments below!

